How to get llama 2 up and running , in a VM, with no GPU, and limited memory on Ubuntu

Image
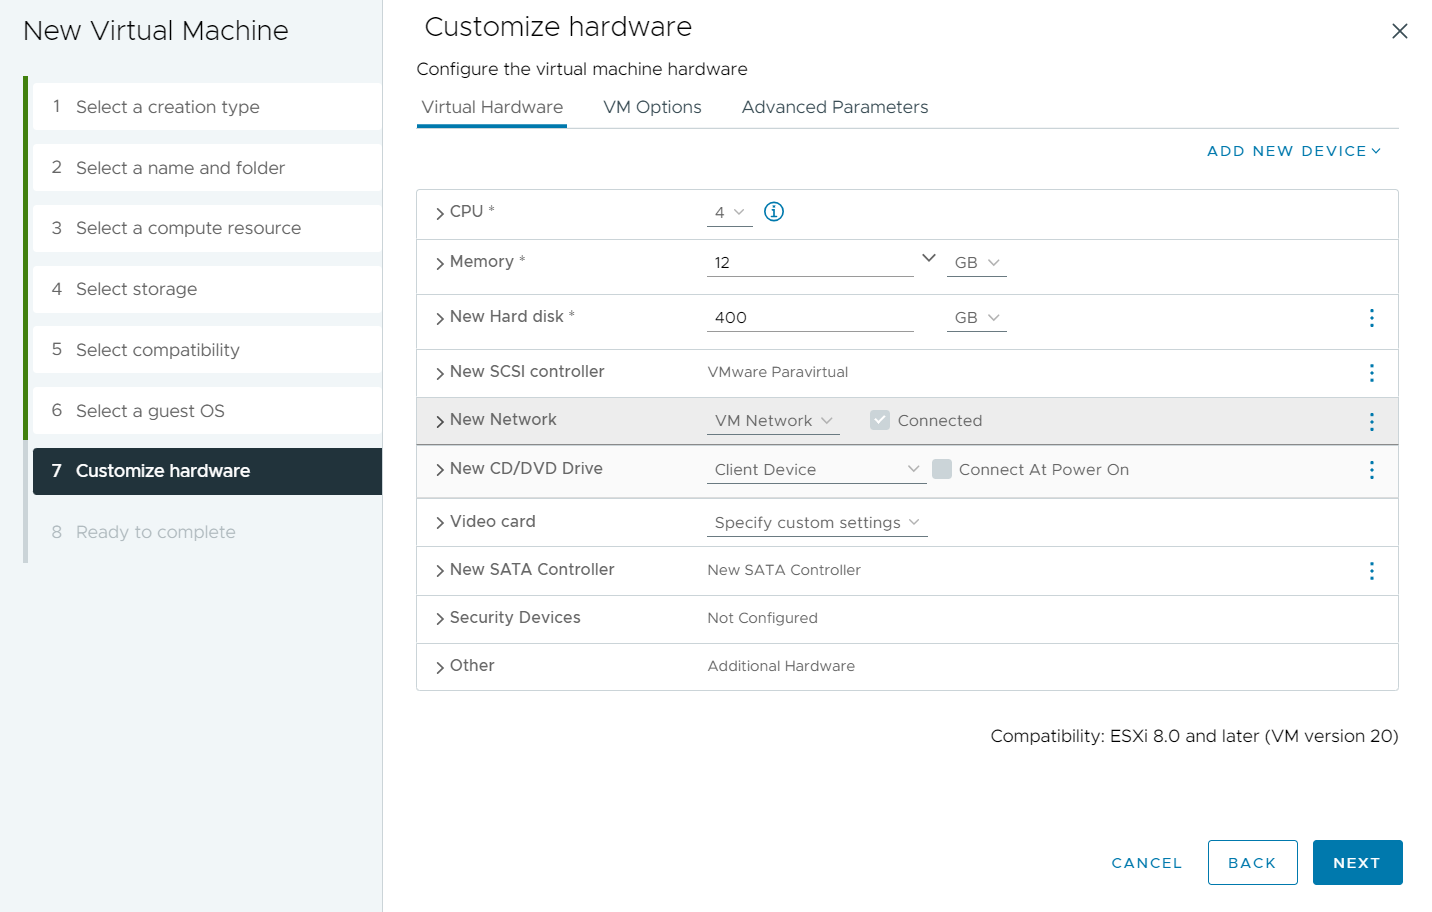
OK I decided to write this up after unsuccessfully being able to find all the required info I needed in one place. In this setup we will be using Ubuntu Server 22.04.2 LTS as the OS. I have this running on a home lab ESXi server 8, on a HP Compaq Pro 6300 SFF CPU = Intel Core i7-3770 Installed Memory 16 GB I have some 10K SAS drives installed for the VM's If you have not already, navigate to  Get Ubuntu Server | Download | Ubuntu and download the 22.04.2 LTS ISO Next Lets create our VM that we are going to run this in. *Note Im using ESXi however you can probably do this in Workstation, Fusion, VirtualBox etc The main things to note on the VM creation. Set Ubuntu 64 bit as the guest OS Set your CPU relevant to the physicals CPU, I will be starting with 4 VCPU Set your Memory to as much as you can tolerate, I will be using 12 Disk Space - we are creating a 100G swap file, and the rest of the file can take up some room , so more is better if you can afford it Dont forget to add the U

Access Point Gui 3.0 ( For AP 2.7.2)

Access Point Gui 3.0 ( For AP 2.7.2)

So I didn't think id write another one of these since I figured there would be one in the latest realease of AP. Well I guess they skipped any sort of Gui again, so here we go!


Requirements:
.NET 4.5.2 or greater
A deployed AP (just needs to be accessible via management IP)

So to start download , extract and double click the Access Point Gui.exe

Once the App has loaded you will be presented with a console 


Enter your AP's management IP or the host name and password. At this point you could continue filling out the settings but lets see what we currently have set by clicking the [Get Current Info] button.


OK Great , there are our current settings, we can copy those off some where in case we need them.


Click the View Enabled? check box to open up the rest of the settings.

Fill out the rest of the settings as required. I have added a function to get the Thumbprint for the connection server (or LB server) of the supplied certificate. After you enter your Proxy Destination URl, cluck the "Auto Import..." check box.


And there we go, we connected to the CS, took the certificate that it presented us, and pulled the thumbprint out and put it in our settings box. Sweet!


Fill out any additional settings and click [Submit]


And there it is your settings have been saved to the AP and you are not good to go.


I have added some additional error checking for things like bad server name and wrong passwords to help us this utility


That's really it, couldn't be easier.
Some additional notes:
the proxy destination thumbprint seams to no longer accept *, so  you have to put something there.

vIDM Settings and System Settings are currently disabled till at least the next update.
I will do some aditional testing on system settings to make sure it good to go and vIDM I honestly have no clue what needs to be but in there but as soon as I can get more info and testing it will be added.


Thanks


Download Here! 


Comments

Post a Comment

Popular posts from this blog

vSphere 7 - Specify a vmkernel adapter to use for NFS datastores Step By Step \ Walkthrough on a DVS

Horizon View 2-factor Authentication for Free! with Google Authenticator or others

How to get llama 2 up and running , in a VM, with no GPU, and limited memory on Ubuntu