How to get llama 2 up and running , in a VM, with no GPU, and limited memory on Ubuntu
OK I decided to write this up after unsuccessfully being able to find all the required info I needed in one place.

Update the installer when prompted

Verify the ubuntu-vg volume


In this setup we will be using Ubuntu Server 22.04.2 LTS as the OS.
I have this running on a home lab ESXi server 8, on a HP Compaq Pro 6300 SFF
CPU = Intel Core i7-3770
Installed Memory 16 GB
I have some 10K SAS drives installed for the VM's
If you have not already, navigate to Get Ubuntu Server | Download | Ubuntu
and download the 22.04.2 LTS ISO
Next Lets create our VM that we are going to run this in.
*Note Im using ESXi however you can probably do this in Workstation, Fusion, VirtualBox etc
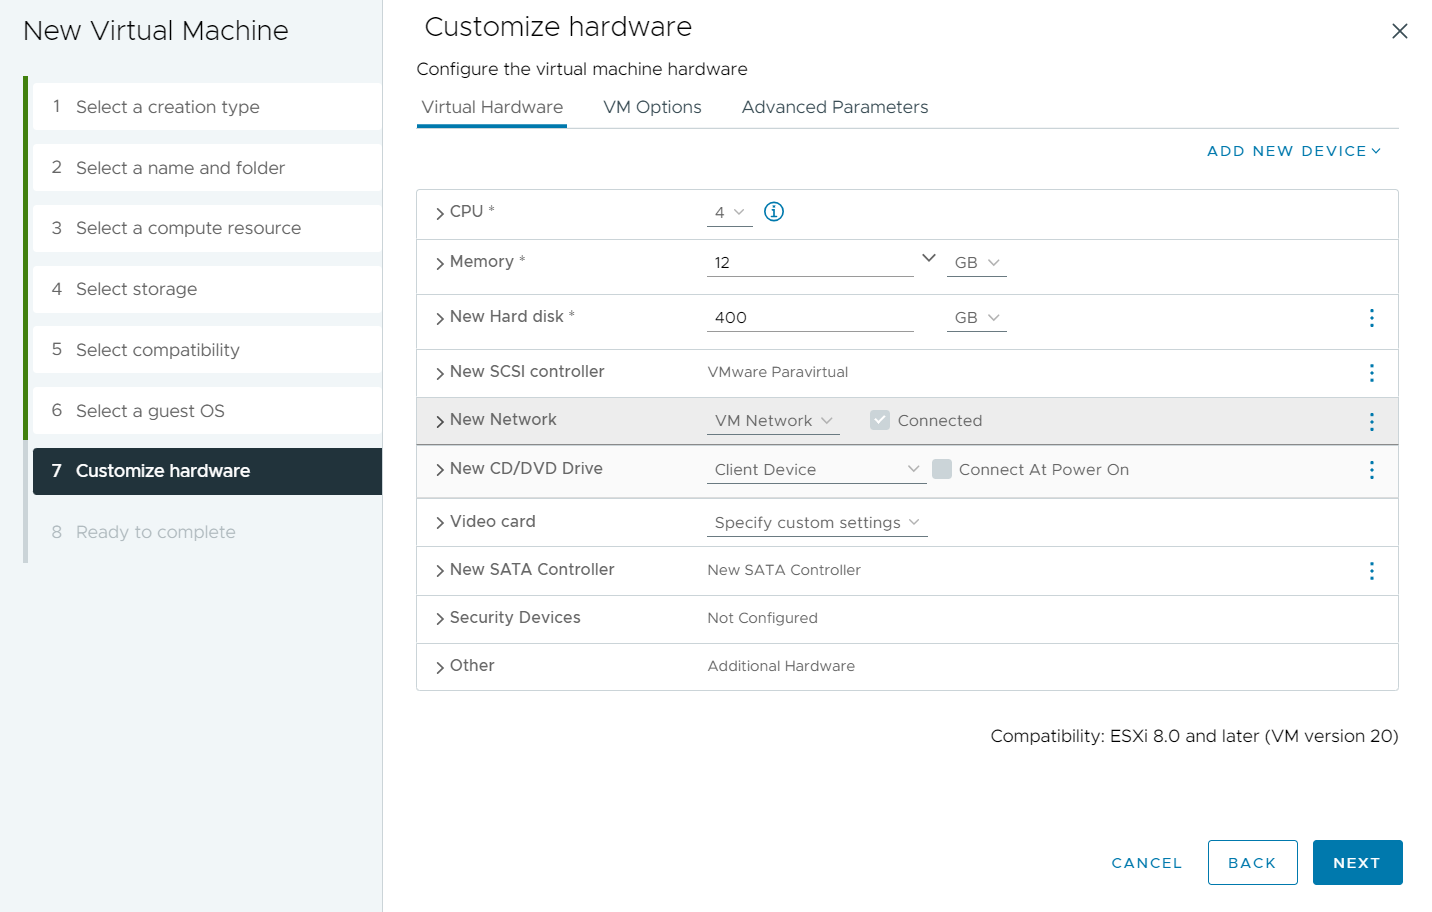
The main things to note on the VM creation.
- Set Ubuntu 64 bit as the guest OS
- Set your CPU relevant to the physicals CPU, I will be starting with 4 VCPU
- Set your Memory to as much as you can tolerate, I will be using 12
- Disk Space - we are creating a 100G swap file, and the rest of the file can take up some room , so more is better if you can afford it
- Dont forget to add the Ubuntu ISO

Boot your new VM and begin the install

Update the installer when prompted
Set a static IP (recomended)
Use the Entire Disk


And install OpenSSH (not required but makes life easier)

Finish Installing, remove the media (ISO) and reboot
To get access to llama 2, you need to head over to Llama 2 - Meta AI
After Clicking the download link, fill out the form, and you will get an Email URL.
You will use this when its time to download the models
Next SSH into your server
This is where allot of tinkering and finding the right info helped.
This site Running llama.cpp on Linux: A CPU and NVIDIA GPU Guide - Kubito , is a huge help for this and we will be following it mostly.
The llama.cpp allows us to use just CPU processing.
First lets make sure we are up to date
$ sudo apt-get update
$ sudo apt-get upgrade

I have no idea why this happens but for some reason ubuntu does not give you all the space int the volume so you have to extend it.
Run the following
$df -h
If you see the folume only giving 98GB then you have to extend it
/dev/mapper/ubuntu--vg-ubuntu--lv 98G 21G 73G 22% /
$ sudo lvextend -l +100%FREE -r /dev/ubuntu-vg/ubuntu-lv
$df -h
/dev/mapper/ubuntu--vg-ubuntu--lv 391G 21G 353G 6%
Now cd to your home directory (or where ever you want to put the application) and download llama.cpp
$ git clone https://github.com/ggerganov/llama.cpp
$ git clone https://github.com/facebookresearch/llama.git
$ cd llama.cpp
$ sudo apt install make
$ wget https://repo.anaconda.com/miniconda/Miniconda3-latest-Linux-x86_64.sh
$ chmod +x Miniconda3-latest-Linux-x86_64.sh
$ ./Miniconda3-latest-Linux-x86_64.sh
Accept the terms , and use the defaults to install miniconda
say yes when prompted to initialize miniconda
Exit the SSH session and reconnect, you should now see a (base) infront of your use name.

$ cd llama.cpp
$ sudo apt install build-essential
$ make
$ conda create -n llama-cpp python=3.10.9
Say yes to proceed
$ conda activate llama-cpp
Now your command should show (llama-cpp)
ok Now lets download some models!
$ cd ../llama
$ chmod +x download.sh
$ ./download.sh
Here is where you enter the URL you got earlier from META
If you have a massive amount of storage , just get all of them.
I do not so I will be selecting 7B-chat to start (its about 12.55 GB)
Take note of where it is saving it to as we will need this info later.
Once downloaded, lets get the swap file created
#check your current swap size
$ free -h
#turn off your current swap
$ sudo swapoff -a
#increase swap to 100GB to be able to offload the entire model from RAM to disk
$ sudo fallocate -l 100G /swapfile
#make sure swapfile permissions are set, then activate
$ sudo chmod 600 /swapfile
$ sudo mkswap /swapfile
$ sudo swapon /swapfile
#check new swap size (should say something like 97Gi)
$ free -h

now cd back into the llama.cpp directory
$ python3 -m pip install -r requirements.txt
And we are going to convert the model we just downloaded
$ python3 convert.py /home/jeramy/llama/llama-2-7b-chat/
This will take some time

Once it completes , it should show you where it wrote the .bin file. We will next quantize that file

Here we will target the file that was created , and create a new one:
$ ./quantize /home/jeramy/llama/llama-2-7b-chat/ggml-model-f32.bin /home/jeramy/llama/llama-2-7b-chat/ggml-model-q4_0.bin q4_0
That should be it, you should be able to run the model with the new file you created:
$ ./main --color --interactive --model /home/jeramy/llama/llama-2-7b-chat/ggml-model-q4_0.bin --n-predict 512 --repeat_penalty 1.0 --reverse-prompt "User:" --in-prefix " " -f prompts/chat-with-bob.txt


And here are some stats from top:


Great insights on VMware View 2-factor authentication! Your explanation makes it easy to understand the setup process. I especially appreciate the details on integrating security measures. Have you tried using Google Authenticator for PC with this setup? It could be a great addition for those managing authentication on desktops. Thanks for sharing this valuable info!
ReplyDeleteTo run on Ubuntu without a GPU and limited memory, use a lightweight CPU-based inference library like Turhost which optimizes performance for low-resource environments. et up a VM with sufficient swap space and run quantized models to reduce memory usage while ensuring smooth operation.
ReplyDelete